Texturing With Blender
Checked: 16. Apr 2009 by Felix
This tutorial shows how to apply texture coordinates to a mesh. Your model should be finished. All unnecessary vertices should be merged. Every future modification of your model will destroy the texture coordinates of the affected faces! We will use LSCM, acronym for Least Squares Conforming Map, which is one of the algorithms for unwrapping a mesh onto the 2-dimensional UV space. It is a very powerful unwrapping method because it can preserve the shape of each face very good.
Marking the Seams
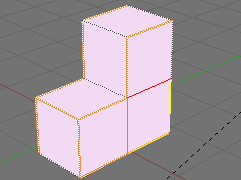
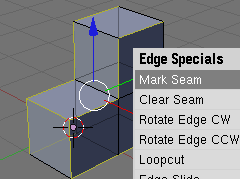 Go into Edit mode and activate edge selection mode with Ctrl + TAB. To map the model to a 2-dimensional UV space, you will obviously have to make some cuts in your mesh. These are the seams. This is how you tell Blender where you want to make seams:
Select the appropriate edges, press Ctrl + E and select "Mark Seam". The edge will turn orange, an indication that it has become a seam. If you change your mind, select the edge again, press Ctrl + E and choose "Clear Seam" to remove this seam and make the edge a "normal" edge again.
Try to find a good balance for the number of seams: many seams will reduce the deformation of the faces a lot (which is good) but it can be quite tricky to create a texture for it, because you will end up with a lot of small inslands of your texture (which is bad). However, it is always a good idea, to make seams where the model has natural borders. You could separate an aircraft or spaceship into wings, engines, weapons, cockpit, gear and hull, for example. Depending on the complexity of your model, you might end up with 5 to 15 separate islands on your UV texture.
Unwrapping the Mesh
 Before you can start unwrapping, you will need another window. Split the 3D-View in the middle by clicking the middle mouse button at a horizontal border of the 3D-View. Select "Split" to split the window in two. Set one window type to UV Image Editor with the drop-down box on the left or with Shift + F10. You should now have a 3D-View window and an UV Image Editor Window, in which you can see the UV plane, where the UV map will be laid out.
Inside the 3D-View Window, select your model and make sure, you are in Edit Mode. Switch to face selection mode by hitting CTRL + TAB and choosing faces. You are now ready to unwrap your mesh.
Select all faces of your model with A, hit U inside the UV window and then choose "Unwrap" to use the LSCM algorithm (Blender ≥ 2.42). Now you should see your unwrapped mesh in the UV window.
Note: If you have a very complex mesh, it may be better to unwrap your model in several small steps. Select only the faces, you want to unwrap instead of all. When you are finished, ensure that you really unwrapped all faces. This can be achieved by selecting all faces in Edit Mode and checking in the UV Image Editor, that there are no faces (quads or triangles) that occupy the complete light gray texture area (because this is the default setting).
Note 2: In Blender 2.45, the unwrapping has changed drastically. A complete mode for the 3d View called UV Face Select Mode was dropped. The selection of faces to unwrap was from then on made in Edit Mode. If you can still activate the UV Face Select Mode with F, then I suggest, that you upgrade to the newest version of Blender.
Modifying UV Layout
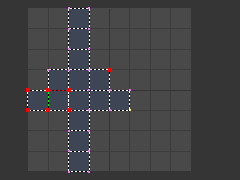 Right now, your UV face layout looks probably pretty weird. Your next step will be to optimize the layout. Try to use the full UV space, that is available and reduce deformations as much as possible. The layout out behaves pretty much like objects in Edit mode: the parts can be dragged, scaled and rotated. Two other useful functions are the following:
- Align/Weld: Use this function to align a group of vertices in 1 or 2 dimensions. Select the group of vertices and hit W. This can be useful to beautify parts, that have been deformed by the unwrapping process.
- Pin/Unpin: You can pin vertices with P. These vertices will be left untouched by the unwrapper. Using this, you can unwrap a part of the mesh, pin the vertices that have been unwrapped without too much deformations and then unwrap the same faces again to improve the accuracy of the shape. Vertices can be unpinned with Alt + P.
Paint the Texture
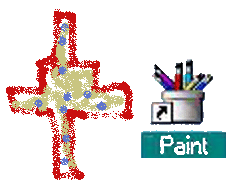 Now that you have laid out the UV map, it is time to create a cool texture for it. First, export the UV face layout from Blender as a tga-file by selecting "UV" → "Scripts" → "Save UV face layout" in the UV window. Ensure, the dimension of your texture is a power of 2.
The tga-file is the pattern for you texture. Open it with your favorite 2d graphic editor and start painting. The pattern can be used as background image. For the beginning, do not expect too much, texturing is really hard to master. Try to make coherent texture that matches the style of your model. The aim is not to apply as many different filters as possible or make the texture extremely colorful.
When your finished, export your texture as tga- or jpg-file.
Applying Texture to Mesh
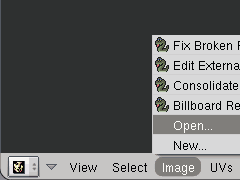 Finished? Then go back into Blender and load your texture in the UV window. First, select you model, enter Edit Mode and select all faces, they appear in the UV Image Editor. Now you can load your texture with "Image" → "Open". Back in the 3D view port, enter Object mode and set the Draw type to Textured. Hit TAB a couple of times to refresh your object. Now you should see your texture on the mesh in the 3D view port. Unfortunately, you will not see it when rendering, because "TexFace" ist turned off by default. Change this in the material menu, so the material uses the image from the UV editor. Now you can render your mesh with your texture visible. Enjoy!
If you wonder, how to export your model from Blender so that it can be loaded into Ogre, then continue reading Object Export with Blender.
Attachments (5)
- markseam.png (6.0 KB) - added by FelixSchulthess 18 years ago.
- apply.png (3.6 KB) - added by FelixSchulthess 18 years ago.
- layout.png (2.6 KB) - added by FelixSchulthess 18 years ago.
- texture.png (8.1 KB) - added by FelixSchulthess 18 years ago.
- unwrap.png (4.9 KB) - added by FelixSchulthess 18 years ago.
Download all attachments as: .zip
