


| Version 1 (modified by FelixSchulthess, 18 years ago) (diff) |
|---|
Texturing With Blender
This tutorial shows how to apply texture coordinates to a mesh. Your model should be finished. All unnecessary vertices should be merged. Every future modification of your model will destroy the texture coordinates of the affected faces! We will use LSCM, acronym for Least Squares Conforming Map, which is one of the algorithms for unwrapping a mesh onto the 2-dimensional UV space. It is a very powerful unwrapping method because it can preserve the shape of each face very good.
Marking the Seams
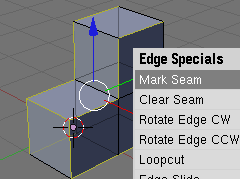
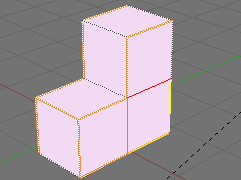
Go into Edit mode and activate edge selection mode with Ctrl + TAB. To map the model to a 2-dimensional UV space, you will obviously have to make some cuts in you mesh. This is how you tell Blender where you want to make cuts: Select the appropriate edges, press Ctrl + E and select "Mark Seam". The edge will turn orange, an indication that it has become a seam. If you change your mind, select the edge again, press Ctrl + E and choose "Clear Seam" to remove this seam. Try to find a good balance for the number of seams: many seams will reduce the deformation of the faces a lot (which is good) but it can be quite tricky to create a texture for it, because you will end up with a lot of small parts of your texture (which is bad). However, it is always a good idea, to make seams where the model has natural borders. You could separate an aircraft or spaceship into wings, engines, weeapons, cockpit, gear and hull, for example.
Unwrapping the Mesh
Modifying UV Layout
Paint the Texture
Apply Texture to Mesh
Attachments (5)
- markseam.png (6.0 KB) - added by FelixSchulthess 18 years ago.
- apply.png (3.6 KB) - added by FelixSchulthess 18 years ago.
- layout.png (2.6 KB) - added by FelixSchulthess 18 years ago.
- texture.png (8.1 KB) - added by FelixSchulthess 18 years ago.
- unwrap.png (4.9 KB) - added by FelixSchulthess 18 years ago.
Download all attachments as: .zip