


| Version 6 (modified by FelixSchulthess, 18 years ago) (diff) |
|---|
Getting Started With Blender
In this tutorial you will learn the basics of working with the 3d-modeling program Blender within one hour. Using Blender can be very confusing, especially if you have never worked with 3d-modeling software before. But don't be discouraged, once you have learned the peculiar function of the mouse in Blender and remember the most important hotkeys, you will be able to create complex scenes and objects in no time. At the end of this tutorial you will have created a simple model of a house. One more thing before you start: if you are stuck, do not hesitate to ask for help. If no help is around, write an email, use Google or check the Blender manual online for quick reference.
The User Interface
After starting Blender, you will see two large docked windows and the main menu bar at the top of the screen. The larger window is the 3D-View. Here you will see the models you create. Below there is the Buttons Window, where you can adjust properties, create different materials or render the scene. For now, some basics about using the two docked windows will be enough:
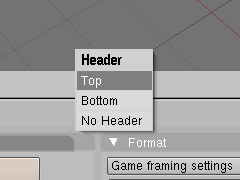
| Left-click the border between two windows to adjust the size of them. Every window has a header containing some content-related controls. By right-clicking into the header, you can select its position in a small menu. You can also hide the header, but this is not recommended for the beginner. | 
|
| With the small drop-down menu at the very left in a window's header, you can change the type of the window. Right now, you have 3D-View and a Buttons window; this is the combination you will use most of the time. Anyway, try to play with the view menus and adjust your windows the way you want them. You may also use more than one window of a kind. | 
|
| You can also split a window to create a new window or you can join two windows to reduce the number of windows. To do this, click the border of a window with the middle mouse button. In the appearing menu, you can select whether you want to Join or Split windows. | 
|
3D-View
We will now concentrate on the 3D-View, the large window showing your scene and your models. The Blender 3d-world has three cartesian coordinate axes: the x-axis (red), the y-axis (green) and the z-axis (blue). In the lower left corner of the 3D-View, you see the current orientation of the three axes. Using the number pad of your keyboard, you can adjust the view. Hit 2/4/6/8 to rotate the view in a predefined direction. Hitting 7 jumps to top view, 1 to side view and 3 is for the front view. 5 toggles between perspective view and orthonormal view. 0 on the number pad switches to camera view. Here, you will see three rectangles marking the cameras view. You will not be able to rotate in camera view, since our camera is still a static object, so you better switch back to normal with 7/1/3. With ±, you can zoom in or out. You can undo all changes to your objects by pressing Ctrl + Z.
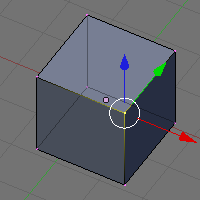
| Selection Use the right mouse button to select an object in 3D-View, for example the cube, which has been there from the beginning. It will be marked with a pink border. Initially it might be confusing to select an object with the right mouse button. Practise it a few times and hopefully you will soon get used to it. This is a frequent point of criticism against the Blender GUI. | 
|
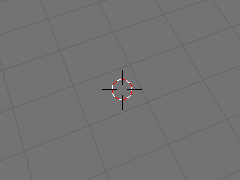
| 3D-Cursor Left-clicking in empty space sets the 3D-Cursor coordinates. The 3D-Cursor is used for many things, for example to place new objects. Remember that you can only specify two coordinates, so you might have to repeat this from another point of view. | 
|
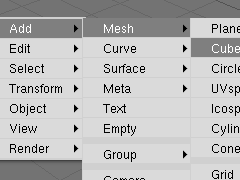
| Adding Objects To add a new object, set the 3D-Cursor to a point of your choice and hit the space bar. In the appearing menu, select Add → Mesh → … to ad a new geometric object to your scene. It will be created at the position of the 3D-Cursor. Blender will probably switch into Edit mode automatically, but we don't want that for now, so hit TAB to exit Edit mode. We will discuss Edit mode later. Note: You can delete a selected Object by pressing X. | 
|
Translation, Rotation and Scaling of Objects
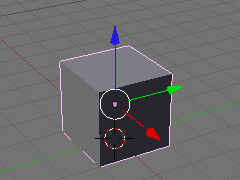
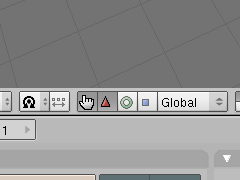
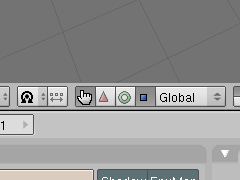
| Moving Objects To move an object, select it and hit G (grab). You can now move the object freely with your mouse. If you hit G and X, Y or Z afterwards, moving the object will be limited to this specific axis. Hitting G and Shift + X/Y/Z afterwards will lock the specified axis, so your object will move only parallel to the other two axes. Left-Clicking on the red triangle in the header of the 3D-View makes the three grab controls appear in the object center (colored arrows). You can also use these controls to move an object directly, by dragging these arrows with the mouse. | 
|
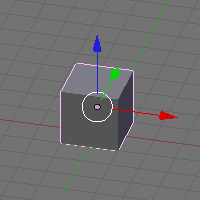
| Rotating Objects It is just as easy to rotate an object. First, you can select an object and hit R (rotate). You may also hit R and X/Y/Z afterwards to rotate only along the specified axis. Second, you can also click the small green circle in the header. The rotate controls (colored rings) will appear. Use the mouse on them to rotate along one axis. | 
|
| Scaling Objects To scale an object, select it and hit S (scale). Now you can scale it freely in all dimensions. To scale only in one dimension, hit S and X/Y/Z afterwards. To scale in two dimensions, hit S followed by Shift + X/Y/Z . Alternatively, click the blue square in the header to bring up the scaling controls (colored arrows with square heads). Drag them with your mouse to scale in a specific dimension. | 
|
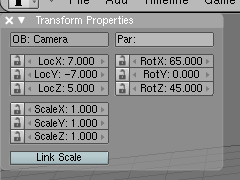
| Numerical Input Sometimes, it may be convenient to modify an object in discrete steps. You can hold Ctrl while doing any of the above transformations to alter the model in discrete steps. While transforming, three numbers in the header of the 3D-View indicate to current translation length, rotation angle or scaling factor, according to which transformation you are doing. Furthermore, it might be useful to enter numerical values or to check how big your object is. Press N to bring up a small window labeled "Transformation Properties". The displayed numbers indicate location, rotation and size of the selected Object. |
Edit Mode
You now know how to transform objects in the so called Object Mode. The same transformations will also be used when we modify parts of an object. For example, we might move only one corner of an object. Select an Object and hit TAB to switch from Object mode to Edit mode. You can do this to toggle between Object and Edit mode at (almost) all times.
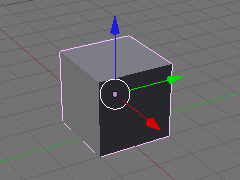
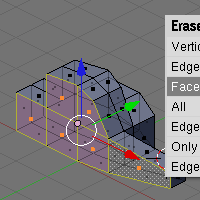
| Vertices, Edges, Faces When you enter Edit mode, your object will look different. Hit A to deselect all, if portions of your object appear to be selected (yellow). You can now see, that a model consists of vertices (the corners of an object marked with pink dots), edges (black lines) and faces (blue areas). You can select vertices by right-clicking them. They will turn yellow. Hold Shift to select multiple vertices. Selected edges will turn yellow also. To select a face, select the vertices on its border. It will turn pink. By hitting A, you can deselect all or select all. | 
|
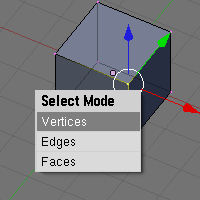
| Changing the Selection Mode Pressing Ctrl + TAB in Edit mode brings up a menu to choose whether you want to select vertices, edges or faces. You still use the right mouse button to select the elements. You can modify your selection in Edit mode just like you learned it above for objects. Use G/R/S or the controls in the object center. Try to move, rotate or scale groups of vertices. | 
|
Extrusion Modeling
Extrusion Modeling is a simple but powerful technique to create apparently complex models. You start with a simple geometric object and extrude its faces to create more vertices. Modify the vertices and extrude more until your model has the desired shape. To benefit from extrusion technology we need three more tools. You must be in Edit mode to be able to access the right commands.
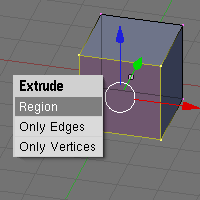
| Extrude Extrusion is something you do with faces: it will create a copy of the face and connect every vertex of the original face with the corresponding vertex of the copy. To extrude a face, select it and hit E. You can now move the new face freely. Note: Hold Ctrl for discrete steps. Normally, you will extrude along the normal of the original face, but in some cases it might be useful to extrude only along one axis. To do this, hit E and X/Y/Z afterwards. | 
|
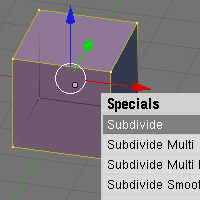
| Subdivide To create finer subdivisions of a face or edge or to modify only a small part of them, it might be necessary to subdivide a face or edge into parts. First, select the parts (edges or faces) of your model, that you want to divide. Then, hit W and choose Subdivide in the appearing menu. Your selection will be subdivided. Note: Hit W and choose Subdivide Multi to split in more than two parts. The W-Menu also gives you more useful functions, when modeling you mesh. | 
|
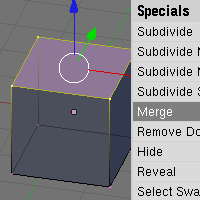
| Merge Sometimes, the two functions above create vertices, that you don't want. It is a good idea to remove them by joining them with another vertex. Like this, you can create a pointed shape, for example. Select the vertices that you want to join. Press W and select Merge. Blender will ask you where to merge the vertices. You have several options: Merge Center will merge at the geometrical center Merge First will merge at the first vertex you selected Merge Last will merge at the last vertex you selected Merge Cursor will merge at the position of the 3D-Cursor Collapse will merge each part of your selection at its center | 
|
A First Model
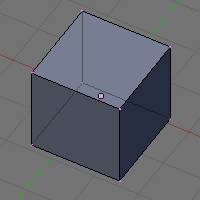
| Now you will create your first model, a simple house without further details. You will need most of the functions you have just learned about. Start with a cube as it is shown in the picture and select it. | 
|
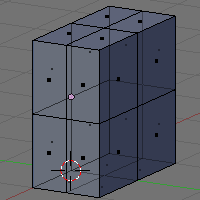
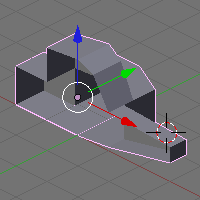
| Hit TAB to enter Edit mode. Adjust the dimensions of the cube and extrude it to get a shape that looks similar to the one on the left. | 
|
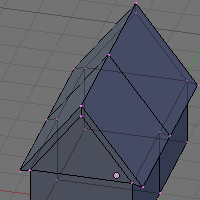
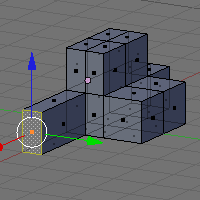
| Use the Merge function to merge the vertices on the top. They will form the top of the roof. You might want to get something similar to the picture at the right. | 
|
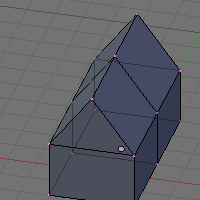
| Extrude both sides of the roof the same length. Then, scale them, so that they make up a good roof between them. Merge vertices that belong together. If there are vertices left inside your model, select them and delete them with X. Feel free to add more detail to you house like a chimney, doors, windows… | 
|
Also check out the Blender Knowlegde Base and the Blender Hotkey Reference. Hope you enjoyed the tutorial.
Attachments (29)
- button1.png (6.3 KB) - added by FelixSchulthess 18 years ago.
- button2.png (10.0 KB) - added by FelixSchulthess 18 years ago.
- add.png (5.8 KB) - added by FelixSchulthess 18 years ago.
- cursor.png (4.9 KB) - added by FelixSchulthess 18 years ago.
- editmode.PNG (4.3 KB) - added by FelixSchulthess 18 years ago.
- extrude.PNG (5.5 KB) - added by FelixSchulthess 18 years ago.
- grab2.png (7.8 KB) - added by FelixSchulthess 18 years ago.
- grab.png (7.3 KB) - added by FelixSchulthess 18 years ago.
- hut1.PNG (5.2 KB) - added by FelixSchulthess 18 years ago.
- hut2.PNG (5.3 KB) - added by FelixSchulthess 18 years ago.
- hut3.PNG (5.6 KB) - added by FelixSchulthess 18 years ago.
- hut4.PNG (5.9 KB) - added by FelixSchulthess 18 years ago.
- merge.PNG (5.6 KB) - added by FelixSchulthess 18 years ago.
- rotate.png (7.2 KB) - added by FelixSchulthess 18 years ago.
- scale.png (7.2 KB) - added by FelixSchulthess 18 years ago.
- select2.PNG (5.4 KB) - added by FelixSchulthess 18 years ago.
- select3.PNG (5.8 KB) - added by FelixSchulthess 18 years ago.
- select.png (7.4 KB) - added by FelixSchulthess 18 years ago.
- split.png (6.4 KB) - added by FelixSchulthess 18 years ago.
- subdivide.PNG (5.2 KB) - added by FelixSchulthess 18 years ago.
- transform.PNG (6.6 KB) - added by FelixSchulthess 17 years ago.
- ship1.png (6.2 KB) - added by FelixSchulthess 17 years ago.
- ship2.png (8.2 KB) - added by FelixSchulthess 17 years ago.
- ship3.png (8.0 KB) - added by FelixSchulthess 17 years ago.
- ship4.png (10.1 KB) - added by FelixSchulthess 17 years ago.
- ship5.png (7.4 KB) - added by FelixSchulthess 17 years ago.
- ship6.png (11.7 KB) - added by FelixSchulthess 17 years ago.
- subsurf.png (7.9 KB) - added by FelixSchulthess 17 years ago.
- mirror.png (7.8 KB) - added by FelixSchulthess 17 years ago.
Download all attachments as: .zip