


| Version 32 (modified by patrick, 18 years ago) (diff) |
|---|
| This is an outdated page! This page is very old and the content is not up to date. Not everything (if any) which is written here will be in the final game! |
|
Windows
MinGW C++ Toolbox
Download the MinGW C++ Toolbox provided on the Ogre SF files site. MinGW must be setup before running Code::Blocks for the first time to make detection of MinGW go smoothly.
Download the installer package which will install the following in your mingw directory ie c:\mingw.
- gcc-core-3.4.5-20060117-1
- gcc-g++-3.4.5-20060117-1 with modified libstdc++ with dynamic string and wide string support (online Manual)
- w32api-3.8
- binutils-2.17.50-20070129-1 (online Manual)
- mingw-runtime-3.11
- gdb-6.3-2.exe (online Manual)
- DrMingw (online manual)
MinGW
Download the MinGW package provided by sourceforge:
Download [[br]
Install it to c:\mingw\ This will include:
- gcc-core
- gcc-g++ with modified libstdc++ with dynamic string and wide string support (online Manual)
- w32api
- binutils (online Manual)
- mingw-runtime-3.11
- gdb (online Manual)
- DrMingw (online manual)
MSYS
Download the MSYS Installer from sourceforge:
Download
MSYS (Minimal SYStem) is a software port of the Unix-Shell to Windows. It's used by MinGW-Developers as a minimal system which can, for example, execute configure-scripts.
- Install MSYS into another path than MinGW
- During the installation process answer yes (y) twice
- Type in the exact path of MinGW directory, so MSYS can configure the important links (most probably this will bee C:\mingw\).
SVN
Now you need to get subversion from http://subversion.tigris.org. There is also a very useful GUI-version at http://tortoisesvn.tigris.org (The command line version is good if you are experienced with the shell, otherwise download the GUI-version).
Get the Ogre source
Check out the Ogre-repository from https://svn.orxonox.net/ogre into a folder named 'ogre', for example 'c:\orxonox\ogre'.
- svn co https://svn.orxonox.net/ogre ogre
(Or do it with TortoiseSVN, the GUI-version of SVN)
Dependencies for Code::Blocks + MingW
For building Ogre 1.4.x source, you will need the Ogre 1.4.x Dependencies. It has all the dependencies built for use with Ogre 1.4.x including the debug and release import libs built from the August 2006 DirectX SDK. Don't use the ones that come with MingW.
Unzip the dependencies into your ogre directory, in our example: 'c:\orxonox\ogre'.
DirectX 9.0c August 2006 edition
Download the SDK. You will need the DirectX SDK if you plan to build and run in debug mode when using Direct3D9 Rendering mode. If you plan on building Ogre from source at a later date then you will need the DirectX SDK also. Note that this SDK doesnt work on Windows 2000 or less.
Code::Blocks
The easiest way to compile Ogre is using the Code::Blocks project files. Use latest Nightly Build. The Ogre sample project files will not work with Code::Blocks nightly builds prior to Jan 29 2007.
- DO NOT USE Code::Blocks 1.0 RC2 or earlier, you must use a recent Nightly build or build from svn HEAD.
- Do not install the Nightly build over 1.0 RC2 or you will experience crashes. Unzip the build into a clean directory. You can unzip Nightly builds into a previous nightly build with no problems.
There are two downloads you must get from the Nightly build post:
- wxmsw26u_gcc_cb.7z
- CB_2006xxxx_revxxxx_win32.7z
Unzip wxmsw26u_gcc_cb.7z witz 7zip into the directory you will unzip CB into. You may have to copy mingwm10.dll from the MinGW bin directory to the Code::Blocks bin directory if you didn't download it from the Nightly Build page.
There are some more detailed install instructions that can be found on the Code::Blocks wiki site.
Make sure that Code::Blocks found your MinGW C++ Toolbox installation by following these instructions here: Code Blocks Compiler Setup.
Directory setup in Code::Blocks
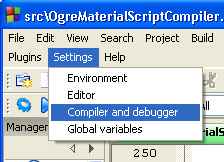
In the settings menu select Compiler and Debugger to setup the directories.
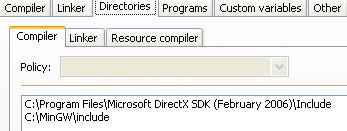
Setup the include directories for the compiler.
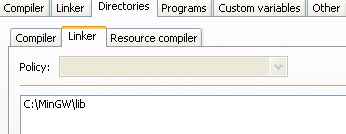
Setup the lib directories for the linker. Note that DirectX SDK lib is not used. The import libs in the Ogre dependencies will be used instead since MingW cannot link directly to the libs provided in the DirectX SDK.
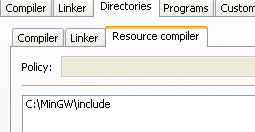
Include directory for windows resource compiler.
Building Ogre
To build Ogre, open Ogre_stlp.workspace in Code::Blocks. Make sure you use Ogre.workspace and not Ogre_stlp.workspace. Ogre_stlp.workspace is for Code::Blocks + MinGW + STLPort.
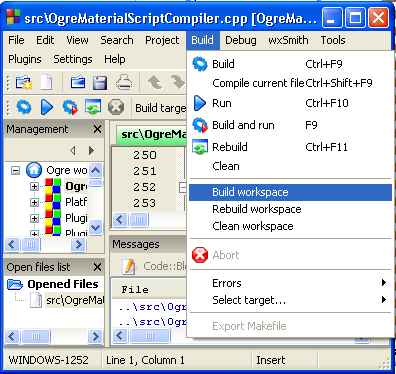
In the build menu select Build Workspace. This will build the debug and release targets of all projects listed in the workspace manager window. This will take some time, so have a break.
If everything worked, you'll have several binaries and libraries in your ogre\Samples\Common\bin\Release folder.
Get the Orxonox source
Check out the Orxonox-repository from https://svn.orxonox.net/orxonox/trunk/ into a folder named 'trunk', for example 'c:\orxonox\trunk'. It has to be in the same root-folder as your Ogre directory.
- svn co https://svn.orxonox.net/orxonox/trunk trunk
(Or do it with TortoiseSVN, the GUI-version of SVN)
CMake
Now we can build Orxonox. To do so, we need CMake. CMake is a cross-platform system for build automation. Download the latest binary release from here and install it (you can check "Do not add CMake to the system PATH").
Create a file with a short name (in this example, we use 'c:\orxonox\trunk\cm') in your trunk-folder with following content:
- [path to your CMake-installation]/bin/cmake . -G "MSYS Makefiles"
Building Orxonox
Open the MSYS console, change into your trunk folder and type:
- ./cm (the file we created just before)
- make
Now run Orxonox with the 'run-script.bat' file in the 'bin' folder. If you used another directory hierarchy than this tutorial, you'll have to adjust the paths in the .bat file.
Attachments (5)
- CB_SetC_D.jpg (8.0 KB) - added by landauf 19 years ago.
- CB_CompilerDir.jpg (8.0 KB) - added by landauf 19 years ago.
- CB_LinkerDir.jpg (5.9 KB) - added by landauf 19 years ago.
- CB_ResDir.jpg (5.0 KB) - added by landauf 19 years ago.
- CB_BuildWorkspace.jpg (27.1 KB) - added by landauf 19 years ago.
Download all attachments as: .zip