


| Version 15 (modified by FelixSchulthess, 15 years ago) (diff) |
|---|
TracNav(TracNav/TOC_Development)?
Content Creation Guidelines
These guidelines have the purpose of ensuring an overall consistency in style and atmosphere in Orxonox.
Color Scheme
The color scheme is based on 3 colors, the brown and red for the dirt and rust that stands for the kind of dark and gritty game we want Orxonox to become. The pale turquoise for the mysterious metal Orx.

❷ #b21100
❸ #c0daca
A GIMP palette is available at colorscheme.
Organization
Whenever you create (any kind of) content for orxonox, you can use the contentcreation repository at http://svn.orxonox.net/game/data/contentcreation to store and organize your work in progress. As soon as you are finished with the particular piece of content that you were working on, add it to both the pool (http://svn.orxonox.net/game/data/pool), which serves as a well organized repository for our complete content, and to the data repository (http://svn.orxonox.net/game/data/trunk), which is the repository of the content needed to play the game. Your files in the pool should also include the source files (e.g. .blend files for models, .xcf or .ps files for any kind of images). Don't forget to (both in pool, as well as in the data repository) add your files and name to the AUTHORS file. Additionally if you've created a new model, you should create a info.xml file stating the authors of the different files and the files the model depends on (e.g. material file and textures) and add a screenshot of your model.
Modelling
Polygon Count
Try to keep these in mind as a soft upper limit for the number of polygons.
- Space ship: 1000
- Space ship weapon: 400
Avoiding Glitches
Please avoid these things. They might mess up the normals and lead to rendering problems.
- Don't leave holes in your mesh. Use F or Shift + F instead to fill them.
- Double vertices, edges and faces. In Edit Mode, you can remove double vertices by selecting all and hitting W → Remove doubles.
- Non-manifold edges, that means edges that do not have exactly 2 adjacent faces. To see which edges are non-manifold, switch to edge selection mode in Edit Mode and choose Select → Non-manifold.
- Vertices in plain air.
- Unconnected submeshes. Make sure, that meshes are fully connected and not just submeshes, that are joined together to form one pink-bordered object.
On Weapons and Spaceships
In order to create a standardized interface between weapons an space ships, these are some guidelines. They make sure, that the weapons fit at the mount points of our space ships without colliding with the space ship mesh. Both designers of weapons and space ships should keep this in mind when working on their models.
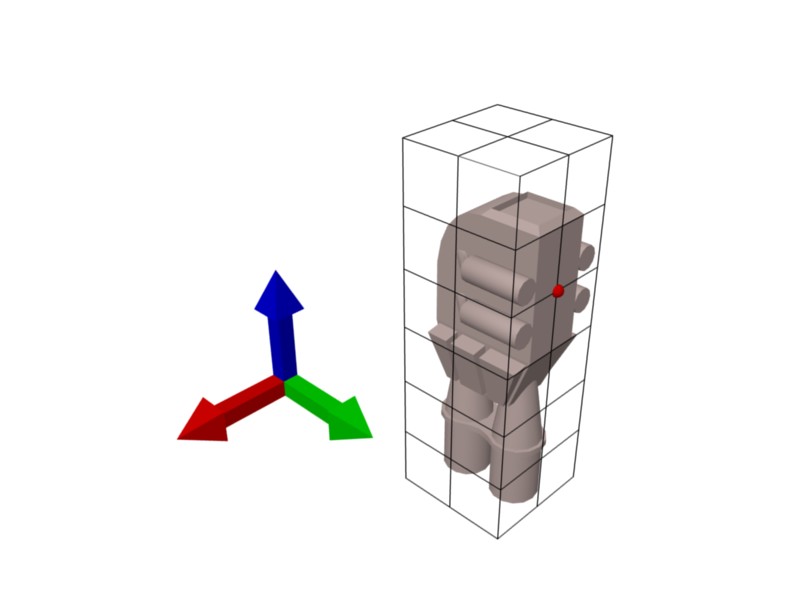
At the moment, we work with only one class of weapons. The weapons of this class must meet several requirements which are all shown in the following picture (click to enlarge).

- The maximum dimensions of the weapon mesh in x, y and z-direction are 2, 2, 6 (see black box in picture)
- The muzzle of the weapon must point in negative z-axis (see arrows in picture). This convention is due to Ogre's coordinate system, where the x-axis points to the left, the y-axis points upwards and the z-axis points out of the screen accordingly. By complying with this convention, we make sure that the weapon models do not have to be rotated when attached to the ship. Depending on your model, it might be easier to model in the x-y-plane and rotating everything when done.
- The same criterion for orientation applies for space ships: Nose/front of ship must point in -z-direction.
- The object center of the weapon model must be on top of the model in y-direction. In x-direction, it is centered and in z-direction it is between the rear third and the center third of our maximum dimension bounding box (see red dot in the picture).
- Be sure to include a plane surface, where the weapon can be attached to the ships hull. The object center should be in this plane.
Attachments (1)
- weapon_guide.jpg (30.8 KB) - added by FelixSchulthess 17 years ago.
Download all attachments as: .zip