


| Version 16 (modified by dafrick, 16 years ago) (diff) |
|---|
Pickups
Author
Description
Pickups, or more precisely Pickupables (in the following referred to as pickups), are items that can be picked up by other entities (which are derived from the PickupCarrier class and I will in the following simply refer to as carriers) and have some effect on the carrier.
Status
Pickups are working, a GUI to manage pickups is in place, however to this date there are only a few actual pickups.
HowTo's
I want to start with explaining, how pickups can be included in levels and how new pickups can be created (coded).
Including pickups in a level
I wanted to make including pickups in level as simple as possible, while also ensuring a division between the pickup itself and how it si represented, e.g. in the Inventory (GUI) or in the game itself. For you to be able to use pickups in your level you need to understand a few concepts.
- Pickups (Pickupables) are entities which have no physical (or graphical) dimension. The simply represent the effect they will have on a carrier, when used.
- The physical (or graphical) dimension of a pickup is called a PickupRepresentation (or in the following referred to as representation).
- The representation of a pickup and the pickup itself are linked to each other, meaning a representation can only represent one type of pickup.
- The entity that actually gives a pickup to a carrier is called a PickupSpawner (in the following called spawner). A spawner creates (based on some parameters) pickups which can be picked up. How the spawner looks in the game is defined by the representation of the pickup it spawns.
- A type of pickup is a specific pickup class with values for all its relevant parameters. This means, that a pickup of the same class with the same values for all parameters except for one is a different type of pickup and will therefore have a different representation.
Using predefined pickups
There is a file called pickup_representation_templates.oxt, which holds the templates for the representations and also templates for pickups. If you want to use pickups you will have to include this file in your level file, somewhere above the Level-tag.
<?lua
  include("templates/pickup_representation_templates.oxt")
?>
There is another file called pickups.oxi which creates all representations needed for the pickups supplied by the pickup_representation_templates.oxt file. You will have to include it as well. It has to be somewhere after the opening Scene-tag and your first use of a pickup.
<?lua
  include("includes/pickups.oxi")
?>
After that you can use all the predefined pickups specified in those two files just by creating a spawner for them in your level. e.g.
<PickupSpawner position="-100,0,-100" respawnTime="30" maxSpawnedItems="10">
   <pickup>
       <HealthPickup
         health = 50
         healthType = "limited"
         activationType = "immediate"
         durationType = "once"
       />
   </pickup>
</PickupSpawner>
Or even simpler, you can use the templates for pickups specified in the pickup_representation_templates.oxt file, e.g.
<PickupSpawner position="-100,0,-100" respawnTime="30" maxSpawnedItems="10">
   <pickup>
       <HealthPickup template="smallhealthpickup" />
   </pickup>
</PickupSpawner>
Using non-predefined pickups
Now let's assume you're not satisfied with the pickups that are provided by the two before mentioned file, but you're not much of a coder either. Luckily there is a way for you. Pickups were created with a broad range of use in mind, which means that the pickups provided by the files are not all there is.
There is no minimum requirement to use pickups in your level files, as long as they have been coded in C++. e.g.
<PickupSpawner position="-100,0,-100" respawnTime="30" maxSpawnedItems="10">
   <pickup>
       <HealthPickup
         health = 33
         healthType = "limited"
         activationType = "immediate"
         durationType = "once"
       />
   </pickup>
</PickupSpawner>
As you can see in the pickup_representation_templates.oxt file and the pickups.oxi file there is no representation defined for this pickup, so the default representation will be used.
Now let us assume you want to create a representation for the inserted pickup above. This is done by creating a representation within the scene.
<PickupRepresentation
    name = "My new health pickup"
    description = "This is an awesome new health pickup."
    spawnerTemplate = "newhealthpickupRepresentation"
    inventoryRepresentation = "MediumHealth"
>
    <pickup>
        <HealthPickup
         health = 33
         healthType = "limited"
         activationType = "immediate"
         durationType = "once"
       />
    </pickup>
</PickupRepresentation>
As you maybe have noticed by now, we also have to define the template for the representation which is used in
spawnerTemplate = "newhealthpickupRepresentation"
the template you need to create defines how the pickup (or actually the spawner) is displayed in your level.
<Template name=newhealthpickupRepresentation>
    <PickupRepresentation>
        <spawner-representation>
            <StaticEntity>
                <attached>
                    -- Here you can put all the objects which define the look of the spawner. --
                </attached>
            </StaticEntity>
        </spawner-representation>
    </PickupRepresentation>
</Template>
Also there is a parameter defining how the pickup is displayed in the Pickup Inventory (a menu to browse your currently equipped pickups).
inventoryRepresentation = "MediumHealth"
This is the name of an image defined in the PickupInventory imageset, which can be found in data_extern/gui/imagesets.
Your done. Now you have a new pickup type with an appropriate representation for your use. If you feel that it is useful in general, please don't hesitate to create a template for the pickup and add your pickup to the pickup_representation_templates.oxt file and the pickups.oxi file, so that anyone who wants to use it can do so quite easily.
Now let's assume you're still not satisfied. I mean, come on, we just used a pickup that already existed and created a new type by changing some parameter values and adding a representation, that's not really anything new now, is it?
Well I've got something for you. It's called a PickupCollection (in the following just referred to as collection). A collection is comprised of many different types of pickups and behaves just as if it were one pickup itself. This is how you create one:
<PickupCollection>
    <pickupables>
        -- some pickups you want to have in your collection, e.g. --
        <HealthPickup template=smallhealthpickup />
        <HealthPickup health=50 healthRate=5 durationType=continuous activationType=immediate healthType=limited />
    </pickupables>
</PickupCollection>
Which pickups make up your collection is entirely up to you, they can be mixed freely.
That's it, there's nothing more to it. However if you have questions regarding any of the above please feel free to contact me?.
Creating a new pickup
Now it gets a little trickier. Therefore I'm just going to supply you with a recipe, or a set of steps you have to take, without which your pickup won't work and point out some common pitfalls.
Creating the class
For a new pickup you need to create a new class in modules/pickup/items. Your class needs to be derived from another pickup class, normally this would either be Pickupable, CollectiblePickup or Pickup. Pickupable is (as mentioned earlier) the base class of all things that can be picked up, thus of all pickups. CollectiblePickup is a (directly) derived class of Pickupable and provides the additional functionality of enabling your pickup to be used in a collection. However you are probably going to want to derive your class form Pickup, because it is a CollectiblePickup and provides some useful methods. So have a look at Pickup.
Once you have created your new pickup class you have to insert it in the PickupPrereqs.h file in the modules/pickup folder and in the CMakeList.txt file in the modules/pickup/items folder. Also have a look at other pickups to make sure you include all the necessary files in your class.
Additionally you have to add your pickup as a friend of the PickupCarrier class. To that purpose open PickupCarrier.h in the orxonox/interfaces folder and add your class under
//! Pre-declarations.
and under
//! Friends.
Coosing the carriers
You also have to choose the carriers that are allowed to pick your pickup up. After you have chosen the entity that carries your pickup you need to do the following.
- The enity that carries your pickup needs to be derived from the PickupCarrier interface. And you need to implement the PickupCarriers virtual functions getCarrierChildren() and getCarrierParent(). Now let me explain, very briefly, why these functions are needed. All pickups are initially picked up by a pawn and then handed down to the entity that effectively carries them. With the above mentioned two function just that is done. A hierarchical structure is established with one parent and a set of children, where the Pawn is the root node of this hierarchical structure, the only entity with no parent.
- Once you have done that you will also want to specify in your pickup which carriers can pick it up, this is done via the addTarget() function. So you have to make sure the target is added whenever one of your pickups is created (so, most conveniently somewhere in the constructor), with the following command.
this->addTarget(ClassIdentifier<MyCarrierClass>::getIdentifier());
Creating the inner workings of your pickup
Now that we have the skeleton of a pickup and we have defined which carriers are allowed to pick our pickup up we are going to take a look at all the methods we can (or sometimes have to) overload from Pickupable, for our pickup to work properly. But first I will introduce some more concepts to make the need for these methods more obvious.
- Since one pickup class can by itself be many pickup types we need a way to find out whether a particular instance of a pickup is of the same type as another instance of a pickup. To that end the PickupIdentifier (in the following just called identifier) was created. The PickupIdentifier accounts for the type of class your pickup is of and also for the parameters (and their values) that distinguish different types of pickups of the same class. Much of the functionality of the pickup module relies on this identifier being correct, thus it is very important to initialize it correctly. (We will see, how that is done in a short while.)
- Every pickup has at least two states which are very important. The first is, whether the pickup is currently in use or not and the second is whether the pickup is currently picked up or not.
Now lets look at the important methods.
- changedUsed() The changedUsed() method is called whenever the state of the pickup transits from being used to not being used or the other way around. Which means this method is probably the most important method you have at your fingertips, since it enables you to apply the effect of your pickup when it gets used and remove the effect as soon as it is no longer in use.
- changedPickedUp() The changedPickedUp() method is called whenever the state of the pickup changes from being picked up to not being picked up or the other way around. For example if you want your pickup to be used as soon as it is picked up, this is the method you have to overload to achieve that behavior (or just let your pickup be derived from Pickup, which implements exactly that behavior if the activationType is set to 'immediate'). You don't have to concern yourself with destroying the pickup or creating a spawner when it changes to not picked up, since that is already implemented with the Pickupable and PickupCarrier class. If you want a different behavior, however once again, this is the method.
- changedCarrier() The changedCarrier() method is called whenever the carrier of the pickup changes. And by that I don't mean the class that is allowed to carry the pickup, but the object that actually carries (or carried) the pickup. Please do not overload this class to implement behavior for picked up → not picked up transitions, use changedPickedUp() for that. For most pickup classes this method doesn't need to be overloaded, one use for it, however is in the PickupCollection class, where the new carrier needed to be communicated to all pickups the collection consists of, whenever the carrier was changed.
Please be aware, that these three methods are methods registered with Super, meaning, that whenever overloading them, don't forget to call SUPER(MyClass, myMethod);
Also when implementing the above methods you should think of what should happen in unexpected situations, e.g. when your pickup is unused and set to used again.
Additionally you should use the destroy() method of Pickupable instead of the method rovided by Orxonox Class, meaning Pickupable::destroy() instead of plain destroy().
- clone() The clone() method creates a new pickup of the same type as the pickup it is cloned from. So the cloned pickup is not exactly the same, as it doesn't necessarily completely reflect the status of the pickup it is cloned from, but all the parameters and their values, that distinguish different types of this pickup class. It needs to be implemented by every pickup class. And it is best if this is done in a very specific way. Below is shown how:
void MyPickup::clone(OrxonoxClass*& item) { if(item == NULL) item = new MyPickup(this); SUPER(MyPickup, clone, item); MyPickup* pickup = dynamic_cast<MyPickup*>(item); // Here you should set all the important parameters (that distinguish the different types of this pickup), e.g. pickup->setSomeParameter(this->getSomeParameter()); // You must also initialize the identifier of the new pickup, this is normally done in a member function called initializeIdentifier() and so just this method is called here. pickup->initializeIdentifier(); } - initializeIdentifier() The initializeIdentifier() method initializes (or more simply put, creates) the PickupIdentifier of the instance of your pickup. Since the important values of the parameters are not yet available in the constructor of your pickup this initializeIdentifier() method must be called as soon as they are available, which normally is in the XMLPort() method, and the clone() method, as seen above. In the initializeIdentifier() method you need to register each parameter that is important for the type of your pickup to its identifier, this is normally done as follows:
void Pickup::initializeIdentifier(void)
{
    // If the get method returns a string.
    std::string val1 = this->getSomeParameter();
    std::string type1 = "someParameter";
    this->pickupIdentifier_->addParameter(type1, val1);

    // If the get method doesn't return a string
    std::stringstream stream;
    stream << this->getSomeOtherParameter();
    std::string type2 = "someOtherParameter";
    std::string val2 = stream.str();
    this->pickupIdentifier_->addParameter(type2, val2);
}
Be aware, this only works for parameters that are simple enough, meaning with pointers for example it will, naturally, not work, and other ways must be found (this is for example done in PickupCollection with a derived class of the PickupIdentifier, the PickupCollectionIdentifier).
- createSpawner() The createSpawner() method needs to be implemented by any pickup directly inheriting from Pickupable (or directly from CollectiblePickup), so if you inherit from Pickup, you don't need to implement this. It is used to create a spawner when the pickup is dropped. A standard implementation would look like this.
bool MyPickup::createSpawner(void)
{
    new DroppedPickup(this, this, this->getCarrier());
    return true;
}
Detailed description
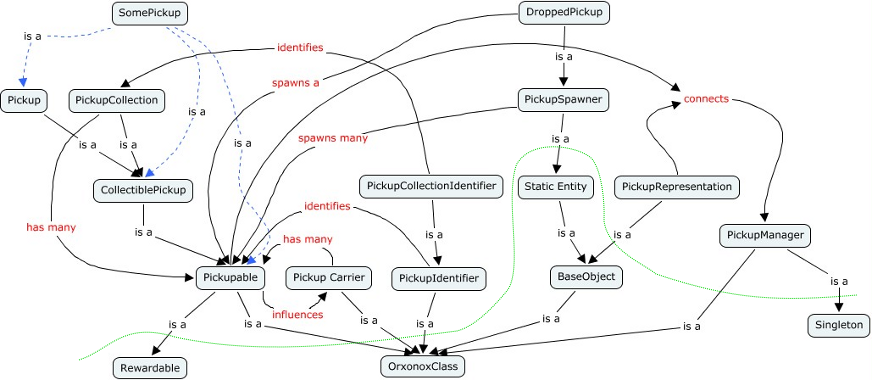
Classtree

Attachments (1)
-
pickups.png
(208.1 KB) -
added by dafrick 16 years ago.
Classtree of pickups module
Download all attachments as: .zip